-
iPhone Programming Tutorial: Creating An Image Gallery Like Over – Part 2

Welcome to the second part of my tutorial series “Creating An Image Gallery Like Over”. In this part of the tutorial, you will learn how to actually display the photos in the UICollectionView as well as give the user the ability to take photos with their camera.
If you haven’t already done so, please go back and complete part 1.
1. Custom UICollectionViewCell
Start by creating a new subclass of UICollectionViewCell and naming it **PhotoCell. **Now, open up PhotoCell.h and add the following code:
#import <AssetsLibrary/AssetsLibrary.h>

@interface PhotoCell : UICollectionViewCell
@property(nonatomic, strong) ALAsset \*asset;
@end
|
Now, open PhotoCell.m and add the following code:
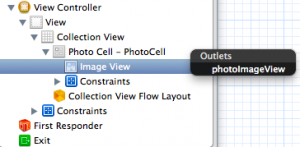
#import "PhotoCell.h"

@interface PhotoCell ()
// 1
@property(nonatomic, weak) IBOutlet UIImageView \*photoImageView;
@end

@implementation PhotoCell
- (void) setAsset:(ALAsset \*)asset
{
    // 2
    _asset = asset;
    self.photoImageView.image = [UIImage imageWithCGImage:[asset thumbnail]];
}
@end
|
- This is an **IBOutlet **to a UIImageView that we will create inside of the Storyboard
- We overwrite the setter method for the asset in order to convert the asset’s thumbnail into a UIImage and set it to the contents of the UIImageView
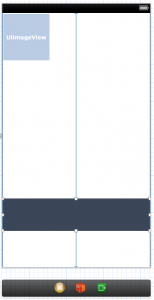
Now that we have the custom cell created, we need to hook it up and create the UIImageView inside of Storyboard. Open **MainStoryboard.storyboard **and click on the default UICollectionViewCell inside of your UICollectionView.
It might be tricky to see the cell as it has a white background and blends in, but it’s there.
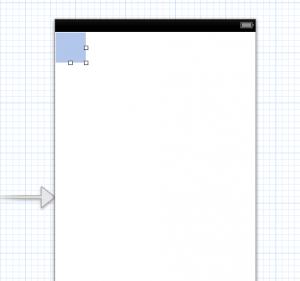
Now, click on the Identity Inspector from the right side bar and change the class to PhotoCell. This will inform interface builder that this object is of the type PhotoCell and let us hook up the photoImageView outlet.

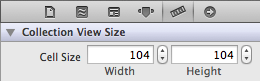
Next, open the size inspector, change the size to **Custom, **the width to **104 **and the height to 104. This will give us nice sized images, with a good amount of padding between them.

The UICollectionView will overwrite these sizes, so we need to change it in one other location. To ensure that the cells stay the correct size, click on the Collection View in left side bar and open it’s Size Inspector. Then set the Cell Size width and height to 104.
The final step here is to drag a UIImageView on to your cell (scaling it to fit the entire cell size), and hook up the IBOutlet to the photoImageView. Do this by control-click and dragging from Photo Cell to the ImageView and selecting photoImageView.
If you build and run at this stage, nothing will be different. That’s because we still need to tell the ViewController class about our new PhotoCell. Open **ViewController.m **and import PhotoCell.h.
#import "PhotoCell.h"|
Now, head down to the collectionView:cellForItemAtIndexPath method and replace the contents of it with the following code:
- (UICollectionViewCell \*) collectionView:(UICollectionView \*)collectionView cellForItemAtIndexPath:(NSIndexPath \*)indexPath
{
    PhotoCell \*cell = (PhotoCell \*)[collectionView dequeueReusableCellWithReuseIdentifier:@"PhotoCell" forIndexPath:indexPath];

    ALAsset \*asset = self.assets[indexPath.row];
    cell.asset = asset;
    cell.backgroundColor = [UIColor redColor];

    return cell;
}
|
What’s changed here is, we are now telling the UICollectionView that the cell it’s returning is of the type PhotoCell. Also, we are fetching the ALAsset out of our array at each index and sending it to the cell so that it can display it’s thumbnail.
Build And Run!
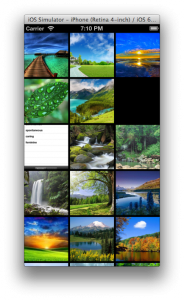
Whoohoo**! **You should now see your photos populating the **UICollectionView. Congratulations!
While, this is definitely cool, you might now be wondering “how do I select a photo?”. Great question, and here is the solution.
2. Selecting Photos
Now that you have all of the groundwork in place, selecting photos from the collection could not be easier. Open up ViewController.m and replace the **collectionView:didSelectItemAtIndexPath **method with the following code:
- (void) collectionView:(UICollectionView \*)collectionView didSelectItemAtIndexPath:(NSIndexPath \*)indexPath
{
    ALAsset \*asset = self.assets[indexPath.row];
    ALAssetRepresentation \*defaultRep = [asset defaultRepresentation];
    UIImage \*image = [UIImage imageWithCGImage:[defaultRep fullScreenImage] scale:[defaultRep scale] orientation:];
    // Do something with the image
}
|
This will get the selected asset and convert it to a UIImage. You are now free to use the UIImage how you want. Perhaps you create a protocol for this class and make a callback to a delegate OR maybe you add this to a UINavigationController stack and push a new view controller on to the stack containing this image. The sky is the limit!
If you look at the Over app and back to your image gallery that you just created, you will notice something is still missing. What if the user wants to take a photo or access other albums? This is where Over adds a bar across the top of the interface with 2 buttons that fall back to the “default” style of fetching images if the user wants to take a photo or access a different photo album. Let’s build this out now.
3. Building The Interface To Take Photos And Access Albums
Start by setting up the IBActions for theses buttons. Open ViewController.m and add the following empty methods:
#pragma mark - Actions

- (IBAction)takePhotoButtonTapped:(id)sender
{

}

- (IBAction)albumsButtonTapped:(id)sender
{

}
|
We don’t need to add the code yet since we still need to build the UI and hook up the IBOutlets. Now open **MainStoryboard.storyboard **and drag a **UIView **right on top of your UIView.
One issue you might run in to here is the view will want to become a subview of the collection view. To combat this, drag the view outside of the collection view inside the left bar so the hierarchy will look like this:

One other “gotcha” is, you must ensure that the view is positioned below the collection view in this list, otherwise it won’t show above it on screen.
Now, let’s manually size and position the view as Interface Building will make things hard on us if we want to position it over our collection view.
Select the view and open the Size Inspector. Set the values as follows:

Again, remember this positioning is optimized for the iPhone 5. So make sure you are testing with that simulator or you won’t see this bar.
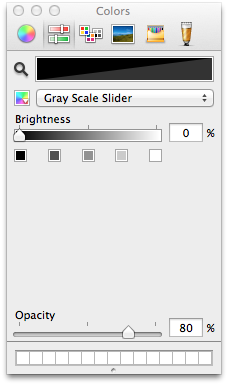
After this, the bar still won’t be visible inside of Interface Builder. We need to set the background color to black with some transparency. Open the Attributes Inspector and click on the background color. Then set the color to black with 80% opacity:

You should now see the bar positioned on the screen like this:
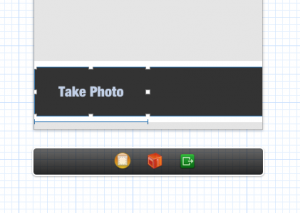
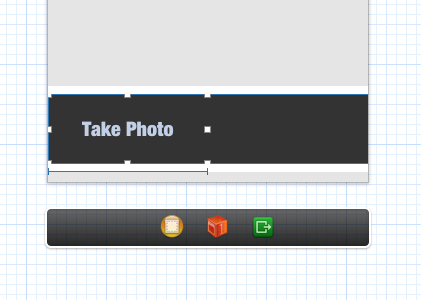
Now drag a **UIButton **on to the view you just created. There are a few things that must be done to style the button:
- Position it at 0,0
- Set the width to 160px and the height to 70x
- Change the type to custom
- Change the text to “Take Photo”
- Change the font to “Helvetica Neue Condensed Black” size 20
- Set the text color to white
When you have completed these steps, the button should look like this:
Now, hook up the IBAction by opening the Connections Inspector and dragging from Touch Up Inside to the View Controller object and selecting takePhotoButtonTapped:
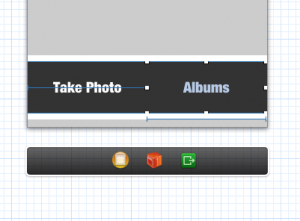
Finally, duplicate this button (copy and paste), rename the title to “Albums”, move it next to the “Take Photo” button and hook its Touch Up Inside to albumsButtonTapped:
The final Interface should look like this:
Go ahead and do a Build and Run and this stage and marvel at your interface development prowess!
4. Actually Taking Photos And Accessing Albums
The final step for this tutorial is to implement the code to bring up the camera as well as bring up the photo albums. Let’s start with the camera. Open ViewController.m and add the following code to the takePhotosButtonTapped: method:
- (IBAction)takePhotoButtonTapped:(id)sender
{
    if (([UIImagePickerController isSourceTypeAvailable:
          UIImagePickerControllerSourceTypeCamera] == NO))
        return; // 1

    // 2
    UIImagePickerController \*mediaUI = [[UIImagePickerController alloc] init];
    mediaUI.sourceType = UIImagePickerControllerSourceTypeCamera;
    mediaUI.allowsEditing = NO;
    mediaUI.delegate = self;
    // 3
    [self presentViewController:mediaUI animated:YES completion:nil];
}
|
- Makes sure that the photo library is available. If the user declines photo access, this will be the case.
- Create the UIImagePickerController and set its source type to UIImagePickerControllerSourceTypeCamera. This lets the media picker know to use the camera and not the image library.
- Finally, present the view controller modally
The method to bring up the photo albums is almost identical to the method above. Add the following code to the albumsButtonTapped: method.
- (IBAction)albumsButtonTapped:(id)sender
{
    if (([UIImagePickerController isSourceTypeAvailable:
          UIImagePickerControllerSourceTypePhotoLibrary] == NO))
        return;

    UIImagePickerController \*mediaUI = [[UIImagePickerController alloc] init];
    mediaUI.sourceType = UIImagePickerControllerSourceTypePhotoLibrary;
    mediaUI.allowsEditing = NO;
    mediaUI.delegate = self;
    [self presentViewController:mediaUI animated:YES completion:nil];
}
|
As I said before, this method is almost identical with the only difference being, we are using **UIImagePickerControllerSourceTypePhotoLibrary **to open up the photo albums.
Build and Run and tap the “Take Photo” button. Make sure you are testing on the device at this stage or nothing will happen since the simulator doesn’t have a camera. You can however test the “Albums” button assuming you have some photos in your photo library.
Now that you are able to pick a photo, you need to be able to access the photo that was selected or taken. To do this implement the following delegate method for UIImagePickerController.
#pragma mark - image picker delegate

- (void) imagePickerController:(UIImagePickerController \*)picker didFinishPickingMediaWithInfo:(NSDictionary \*)info
{
    UIImage \*image = (UIImage \*) [info objectForKey:
                                          UIImagePickerControllerOriginalImage];
    [self dismissViewControllerAnimated:YES completion:^{
        // Do something with the image
    }];
}
|
This method fetches the selected (or taken) image and stores. It then dismisses the camera or photo albums allowing you to do whatever is needed with the image.
5. Next Steps
By now, you should have learned how to use the **ALAssets **library to interact with a user’s photos and use them to build a custom interface. You also learned how to use a UICollectionView to display a grid of photos.
With this knowledge in hand, you should now be able to make much more interesting photo selection interfaces than the default one Apple has to offer. Other apps like Google+ and Instagram both have very slick photo pickers and I hope this tutorial has your gears going thinking about other interesting photo selection interfaces.
You can download the source from this tutorial on GitHub
Feel free to leave a comment if you have any questions. Happy Hacking!
-
iPhone Programming Tutorial: Creating An Image Gallery Like Over – Part 1
Recently, I have had to build an app (download link) that required the user to choose a photo from their photo library. Rather than just throwing up a UIImagePickerController like many apps, I decided to add a little bit of style. Being inspired by Over’s ultra simplistic (and beautiful) photo selection interface, I decided to fancy things up a bit.
For this tutorial, I will start with a Fresh iOS6 View-Based application that uses Storyboards and ARC. Also note that I will be optimizing for the iPhone 5 resolution. You are free to make the tweaks necessary to deploy on the iPhone 4 and 4S.
Here is a breakdown of what we will cover in this part:
- Creating a UICollectionViewinside of Storyboard
- Using the ALAssetsLibrary to fetch photos from the user’s Camera Roll
- Displaying the ALAssets inside of the UICollectionView
1. Preparing The IBOutlets
Start by opening up **ViewController.m **and replacing the @interface declaration at the top with the following code:
@interface ViewController ()<UICollectionViewDataSource, UICollectionViewDelegate, UICollectionViewDelegateFlowLayout>
@property(nonatomic, weak) IBOutlet UICollectionView \*collectionView;
@end
|
This will declare the **IBOutlet **needed to hook up the main UICollectionView that we will be using to display the user’s photos. I have also set up our class to be a UICollectionViewDataSource, UICollectionViewDelegate, and UICollectionViewDelegateFlowLayout. This is necessary when interfacing with the UICollectionView.
2. Setting Up The UICollectionView In Storyboard
Open up **MainStoryboard.storyboard **and drag a UICollectionView on to your view ensuring that it stretches the entire screen.
Then, Control-Click and drag from the **UICollectionView **to your **ViewController **Object and set it as the **delegate **and datasource.

Finally, **Control-Click **and drag from **View Controller **to Collection View and selected **collectionView **to make the **IBOutlet **connection.

Now, we need to give a Cell Identifier to the UICollectionViewCell so that we can reference it in code. Click on the default cell inside of the UICollectionView and open the **Attributes Inspector. **For the Identifier type in PhotoCell. The cell might be a little tricky to see as its background color is clear, but it’s there. Simply click in the top left corner of the UICollectionView.

Now that the UICollectionView has been set up, it’s time to fetch the photos from the user’s photo library.
If you are using the simulator, make sure to populate the Photo Gallery with images from the web. Simply open up a browser, do a Google Image Search, and click and hold on various images. You should have an option from the menu that pops up to save the images to your camera roll.
Finally, open up the **Photos** app on the simulator to initialize the Assets Library.
3. Fetching ALAssets (user photos) From The ALAssets Library
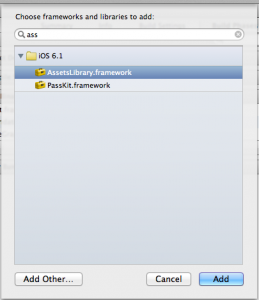
In order to interface with the user’s photo library, we must first import the **AssetsLibrary.framework **framework. To do this, click on your project in the sidebar, select the Target, then click **Build Phases, **expand the Link Binary With Libraries section and click the **+ **button. Do a search for **Assset **and then double click on AssetsLibrary.framework.
It should now be added to your project and ready to use. Now that it has been linked, we must import it into the **ViewController.m **file. Open up **ViewController.m **and add the following import to the top of the file:
#import <AssetsLibrary/AssetsLibrary.h>|
Before we can fetch the user’s photos, we need to set up an NSArray to put them in. Add the following line within the **@interface **declaration at the top.
@property(nonatomic, strong) NSArray \*assets;|
Now, add the following method to your class:
+ (ALAssetsLibrary \*)defaultAssetsLibrary
{
    static dispatch_once_t pred = ;
    static ALAssetsLibrary \*library = nil;
    dispatch_once(&pred, ^{
        library = [[ALAssetsLibrary alloc] init];
    });
    return library;
}
|
This is a static method that creates a static instance to the ALAssetsLibrary. The reason this is needed is, when we enumerate the ALAssets in the next method, it seems that the assets get released immediately and otherwise wouldn’t be able to be used in the rest of the application. I will explain this a little more in a moment.
Head over to viewDidLoad and add the following code:
- (void)viewDidLoad
{
    [super viewDidLoad];

    _assets = [@[] mutableCopy];
    __block NSMutableArray \*tmpAssets = [@[] mutableCopy];
    // 1
    ALAssetsLibrary \*assetsLibrary = [ViewController defaultAssetsLibrary];
    // 2
    [assetsLibrary enumerateGroupsWithTypes:ALAssetsGroupAll usingBlock:^(ALAssetsGroup \*group, BOOL \*stop) {
        [group enumerateAssetsUsingBlock:^(ALAsset \*result, NSUInteger index, BOOL \*stop) {
            if(result)
            {
                // 3
                [tmpAssets addObject:result];
            }
        }];

        // 4
        //NSSortDescriptor \*sort = [NSSortDescriptor sortDescriptorWithKey:@"date" ascending:NO];
        //self.assets = [tmpAssets sortedArrayUsingDescriptors:@[sort]];
        self.assets = tmpAssets;

        // 5
        [self.collectionView reloadData];
    } failureBlock:^(NSError \*error) {
        NSLog(@"Error loading images %@", error);
    }];
}
|
- Grab our static instance of the ALAssetsLibrary
- Enumerate through all of the **ALAssets **(photos) in the user’s Asset Groups (Folders)
- Enumerate each folder and add it’s **ALAssets **to the temporary array
- Sort the assets list by date (this won’t work yet, but I will show you how to fix later). For now this code is commented out and the Assets will be sorted however they come out.
- Reload the UICollectionView (this won’t work yet as we haven’t set up the delegate methods)
Now that we have an NSArray populated with ALAssets, let’s set up the **delegate **methods for the UICollectionView in order to populate it with data.
4. Populating the UICollectionView With Data
A UICollectionView functions much like a **UITableView **having delegate and datasource methods. Add the following methods to your ViewController class to populate the view.
#pragma mark - collection view data source

- (NSInteger) collectionView:(UICollectionView \*)collectionView numberOfItemsInSection:(NSInteger)section
{
    return self.assets.count;
}

- (UICollectionViewCell \*) collectionView:(UICollectionView \*)collectionView cellForItemAtIndexPath:(NSIndexPath \*)indexPath
{
    UICollectionViewCell \*cell = (UICollectionViewCell \*)[collectionView dequeueReusableCellWithReuseIdentifier:@"PhotoCell" forIndexPath:indexPath];

    ALAsset \*asset = self.assets[indexPath.row];
    //cell.asset = asset;
    cell.backgroundColor = [UIColor redColor];

    return cell;
}

- (CGFloat) collectionView:(UICollectionView \*)collectionView layout:(UICollectionViewLayout \*)collectionViewLayout minimumLineSpacingForSectionAtIndex:(NSInteger)section
{
    return 4;
}

- (CGFloat) collectionView:(UICollectionView \*)collectionView layout:(UICollectionViewLayout \*)collectionViewLayout minimumInteritemSpacingForSectionAtIndex:(NSInteger)section
{
    return 1;
}
|
This code should be fairly straight forward if you have ever worked with a UITableView. The only lines to note are where ‘cell.asset = asset’ is commented out and we set the cell’s background color to red. We will uncomment that line when we create a custom cell to display the image (for now it won’t). I have also set the background color to red so that you can see that the number of cells is actually corresponding to the number of photos in the camera roll.
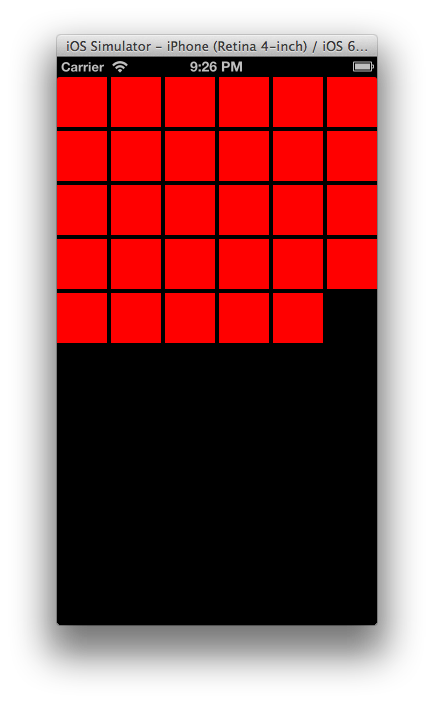
Build and Run!
Let’s take a break to do a build and run to see what happens. If you have hooked everything up correctly, you should see a black screen with red squares on it with a count equalling the number of photos in the user’s library.
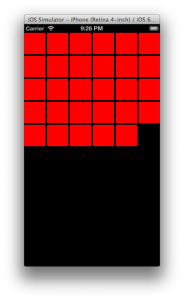
Not too exciting, however it shows that we are displaying a number of cells corresponding to the number of photos in the user’s asset library. At least it’s showing that you have done something. The next step is to create a custom UICollectionViewCell that actually displays the photos, which we will do next time.
5. Next Time
That’s all for today. In a ploy to get you to come back to my site (and subscribe to my RSS feed), I have chosen to break this post up into two parts.
Luckily for you, I wrote the above message a while ago. Click the link below to go to part 2!
iPhone Programming Tutorial: Creating An Image Gallery Like Over – Part 2
Stay tuned!


subscribe via RSS
